Microsoft OneNote, a notetaking application included in the Microsoft 365 suite of apps, has become an essential productivity tool for businesses today. However, many people have yet to take advantage of OneNote’s capabilities and potential value at work.
As a digital notebook that you can access anywhere, anytime on multiple devices, OneNote can serve a vital role as you gather, organize, and share information needed for your daily work. As the name suggests, it is intended primarily for taking notes, but this is just the tip of the iceberg when it comes to what you can accomplish with OneNote.
In this video and article, I’ll share 10 OneNote features and tips that you can use to help you improve the quality of your digital notetaking and maximize the value and productivity gains you get from this awesome Microsoft tool.
1. Organize Sections & Pages
OneNote files are organized like this: each OneNote file is called a Notebook, inside Notebooks are Sections, and underneath those Sections are Pages. You can open multiple Notebooks and quickly switch between them, so you are free to organize your notes however you see fit.
In the example here, my Notebook is called “Paddy’s Pub”, my Section is called “Personnel”, and my Pages are called “Dennis”, “Charlie”, “Mac”, and “Dee”.
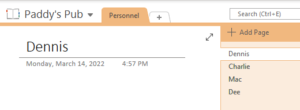
After you decide how your Notes will be structured, there are additional features that you can use to further improve the organization of your Notebook.
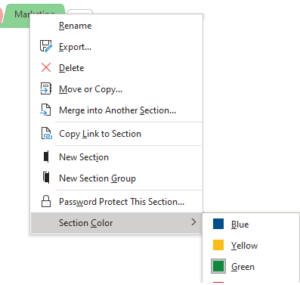
First, you can color-code your Sections by right clicking the Section tab and going to Section Color to choose a color. Maybe I want my HR-related stuff to be blue, my operational stuff to be red, and my sales stuff to be green.
Then, you can create sub-pages by right-clicking on a page and choosing Make Subpage.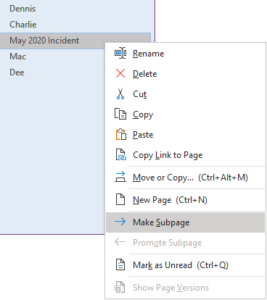
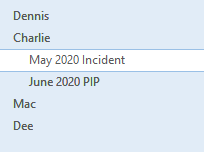
You may want to do this to group related pages under a common master page, like in my example where I put certain employee-specific pages under that employee’s page.
2. Use Page Templates
OneNote includes several pre-built page templates you can use to introduce formatting to your pages for specific purposes. If you go to the Insert tab on the Ribbon, then click Page Templates, the Templates pane will appear on the right where you can see all the templates available. Click the one you want to try.

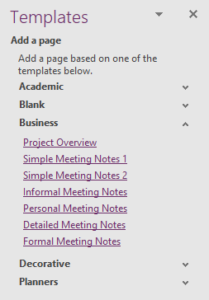

When you select a template, a new page will be created in the current Section. Play around with different templates to see what is available and what might be useful for you.
Once you land on a template you want to use, you can rename the new page and move it wherever you want.Shown here is the template called “Detailed Meeting Notes”, which I renamed to June 2021 to help me run this month’s staff meeting.
3. Enable Rule Lines
By default, pages in OneNote are completely blank white. But have you ever tried to take notes on a blank white piece of printer paper? It’s much easier to stay organized with notebook paper that has horizontal rule lines, so you don’t end up slanting your writing.
![]()
 To enable rule lines, go to the View tab on the Ribbon, and click Rule Lines. If you click the dropdown arrow, you will see other options, like wide-spaced and grid lines.
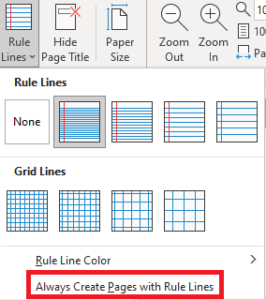
If you like using pages with rule lines, you can click the Rule Lines dropdown and select the option Always Create Pages with Rule Lines.
4. Use Docked Windows

Docked Windows is a feature that allows you to keep a certain OneNote page on your screen while you browse other content, like web sites. Go to the View tab on the Ribbon and click New Docked Window.
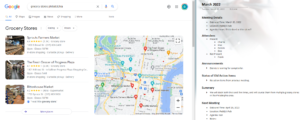
When you do this, you will notice the page you currently have active will appear on the right side of your screen, and everything else on your screen will be pushed to the left side. You can resize your docked page as you want, up to half of the screen. Then, you can move other windows in and out of the left side of the screen, and they will automatically size to the edge of the docked OneNote page. This is particularly helpful if you are working on taking notes that require research online, or in online meetings where you want to see the video feed while still being able to take notes.
5. Incorporate Outside Data
One of the features of Microsoft Office that has always been highly attractive is the ability to integrate files from its different programs so that they work together. OneNote is no different; you can include other kinds of files directly on your notes page in line with your text. Spreadsheets are particularly useful to include in notes pages because you can use Excel features like formulas and conditional formatting.
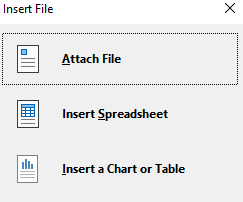
To include an Excel spreadsheet in your notes, go to the Insert tab on the Ribbon and click Spreadsheet. You can either choose an existing spreadsheet or create a new one. If you choose to insert an existing Spreadsheet, you will need to choose a Spreadsheet and then you will see the below dialog box, asking if you want to Attach File, Insert Spreadsheet, or Insert a Chart or Table. If you choose Attach File, it will create a copy of the spreadsheet and show that on your page so you can open and see it. If you choose one of the other options, the data will be pulled live from the existing Spreadsheet, so edits you make there will reflect in OneNote.
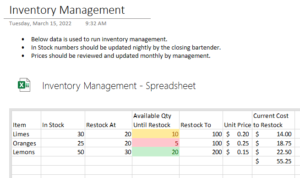
In this example, the bar uses a spreadsheet for inventory management where they can keep track of items they have in stock and Excel helps them calculate how much they will need to pay to restock.
6. Record Audio and Video
Sometimes you want to include more than just text or numbers. Among many other forms of multimedia, OneNote allows you to record audio and video files and include them on your notes page.

To record Audio or video, go to the Insert tab on the Ribbon, and youwill see the Record Audio and Record Video buttons. Click either to get started.
You will notice the Ribbon change to a Recording tab with other controls, and at this point your recording has started (assuming your microphone and/or camera are configured properly). You can pause and resume your recording, and when you are done you can click Stop and then play your recording to ensure you got it right.

On your notes page, the recording will show a timestamped icon that you can double-click and watch or listen. Below is an example of both video and audio.
7. Use Tags
Tagging is a feature in OneNote that lets you assign labels to your notes to classify certain kinds of information. In the Home tab of the Ribbon, you will see Tags has an entire section where there are several controls. I’ll just go over a few of the main ones.
- To Do tags should be added to tasks that need to be completed, and when added a checkbox will appear to allow you to mark tasks as complete.
- Important tags display a star next to the tagged data and should be used to draw attention to important items in the notes.
- Question tags identify unanswered questions in the notes that may need input from others or additional research.

Simply position your cursor on the text you want to tag, then click the tag you want from the Tags dropdown. (Expand the dropdown menu to reveal many other tags).
Here is an example of a list of items that are classified using tags.

8. Share Your Notebook
Of course, you can’t have fun with Microsoft Office if you’re not sharing, so just like all the other apps in the suite, OneNote allows you to share with others inside or outside your organization.
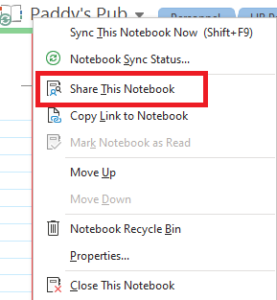
To share your notebook, go to the File menu (all the way left in the Ribbon) and click Share. You will be presented with the options to add people, decide what kind of permissions you want them to have, and decide how you want to share it. You can also access this menu by right-clicking on the name of your Notebook and clicking “Share this Notebook”.
When you share a notebook with others, OneNote keeps track of a history of changes and who makes them. In this example, you can see the initials of another editor in my company who added an announcement to our meeting notes.

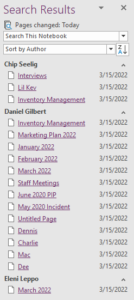
What’s more, if you go to the History tab in the Ribbon, you can click on Recent Edits and choose a time frame to see a timeline of changes on the right side of the screen. Choose the Sort by Author option in the dropdown and you can see changes broken out by who made the change.
9. Password Protect Your Notes
Let’s say you want to share a notebook with a team of people, but there is private information you want to keep in the notebook for convenience but not open it up to the entire team. In this case, you can password protect one or more Sections in your Notebook.
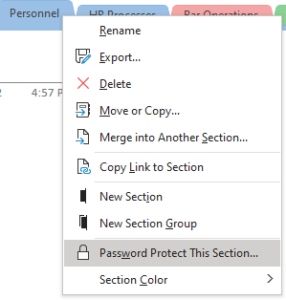
To make this happen, while inside the Section you want to protect, go to the Review tab in the Ribbon and click Password. You can also right-click the Section name and click Password Protect This Section…
Then click Set Password in the right pane and choose a password. After that, anyone who accesses that Section will need the password to access it. (Keep in mind, this includes you, so if you’d rather not need to enter this password, you should keep sensitive information elsewhere).
If you click on the Password Options link at the bottom of the right pane, you will be brought to the Advanced OneNote Options, where you can scroll down and edit some of the behavior of password protected sections.

10. Export Your Notes
Finally, when you are finished building a Notebook, or perhaps have gotten it to a point where you want to publish it and/or share it with a larger audience, you can export your notes to a few different formats. To do so, go to the File menu and click Export. Here you will see that you can export a Page, a Section, or the entire Notebook, and the formats you can use are listed on the right.
Most often, you will probably want to export to a PDF document, so it is in a published, non-editable format. This gives some permanence and presentation to your notes. In some cases, you may choose to export to a Word document (.docx) if you think the recipient will want to continue editing the notes in Microsoft Word.
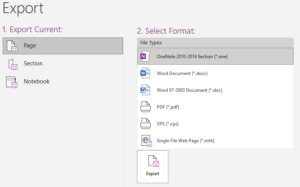
Choose your settings and click Export, and all you will need to do then is choose a location and file name.
While getting the hang of some of these features may take some practice, once mastered they can really make a difference in your ability to more effectively capture and synthesize the information you need.
As you can see, OneNote is more of an Information Organization tool than a simple note-taking app. There are so many ways that you can use OneNote to improve your productivity and the way you collaborate with your team. The tips I shared today are just a few of the many game-changing features OneNote has to offer.
To learn more about how Kite Technology can help you leverage everything Microsoft 365 has to offer, please reach out to us to schedule a conversation. We would love to learn more about your organization and discuss your business technology needs.

Daniel Gilbert
Chief Operating Officer
Kite Technology Group


